
Learn how to make a video – make your video look good and professional even if you’re just a beginner and don’t have gear like the pros.
Most of us can shoot videos.
Especially now that many mobile devices have cameras that can shoot good videos.
However, most of these videos shot today just remain in our devices. It means we don’t really think about how the video looks. We just want to capture the subject and keep a memory.
But, when you want to post videos online for your Youtube or Instagram channels, the issue of quality comes into mind.
And there’s a possibility you don’t feel confident that your videos cut the mark for professional quality.
This is important especially for a video tutorial, marketing films or videos designed to influence viewers to take some action.
Don’t worry though.
It’s easy to create a good video today. It doesn’t matter if you have any technical skills or not.
You just need the right information! and that’s exactly why we made this article – to help you.
Just go through the tips we give below.
By the time you read the last point, you’ll be armed with the tricks you need to create killer videos. Just like those created by a pro.
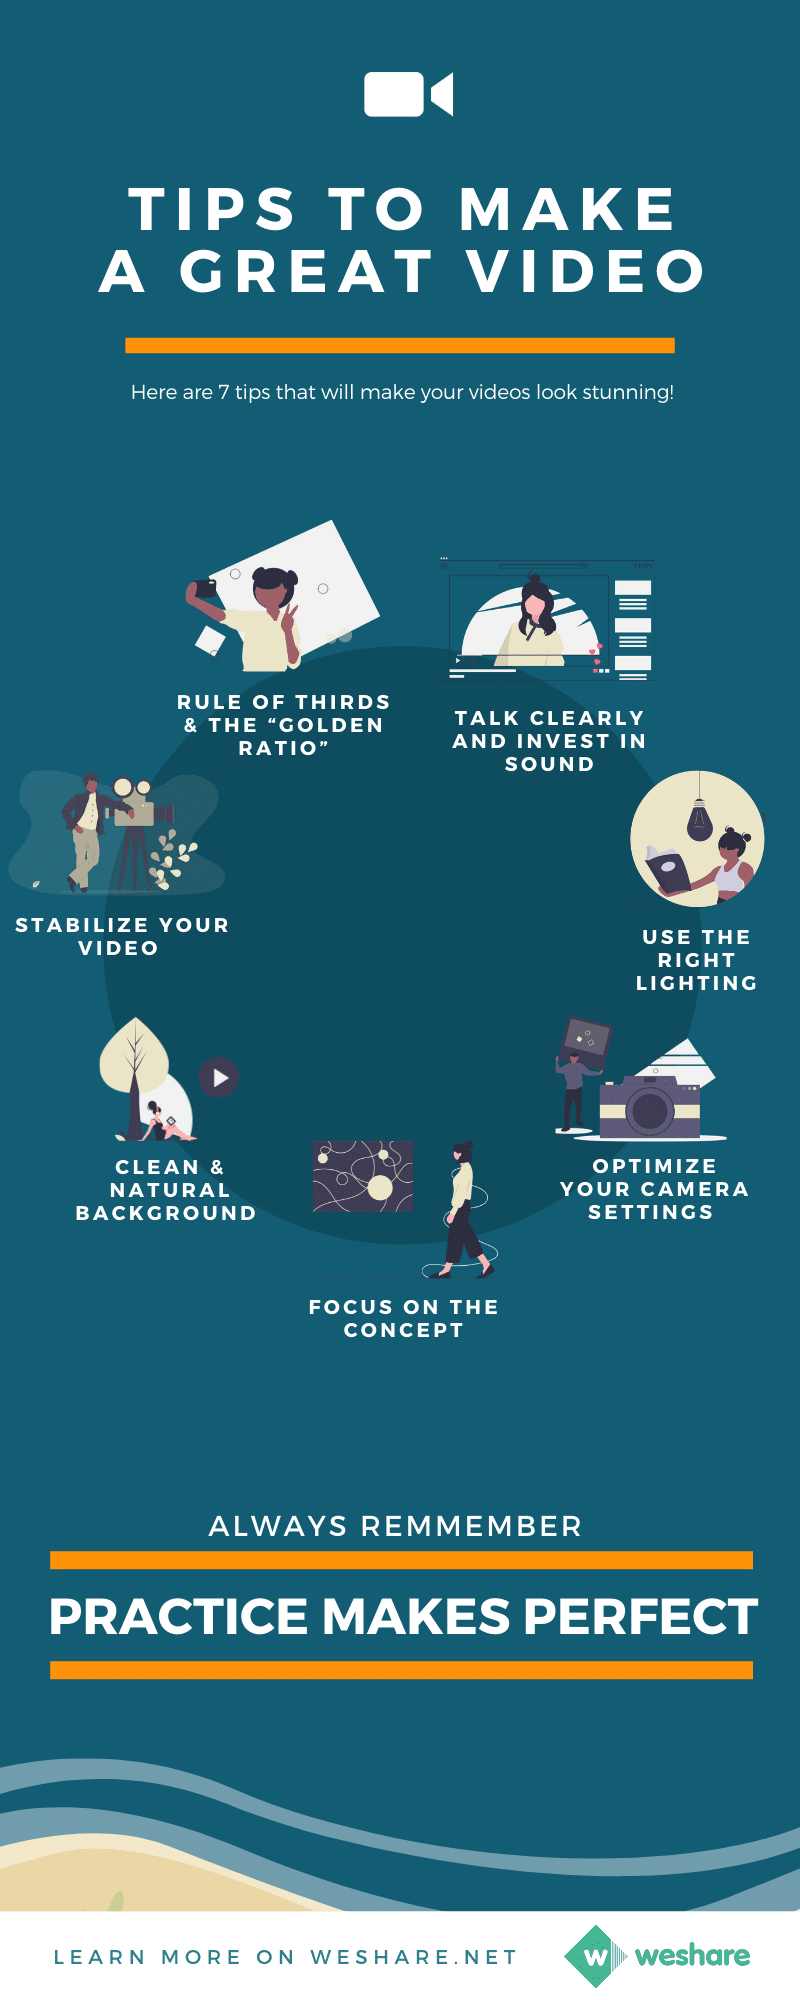
Tips and techniques:
- #1 Just start!
- #2 It’s All About The Concept
- #3 Film On A Clean & Natural Background
- #4 Record In Landscape Mode
- #5 Use The Right Lighting.
- #6 Focus And Stabilize Your Video
- #7 Use The Rule Of Thirds And The “Golden Ratio”
- #8 Optimize Your Camera Or Phone Settings
- #9 Use Basic Video Editing Concepts
- #10 Work On Your Camera Presence
- #11 Talk Clearly And Be Focused
- #12 Invest In The Sound Of Your Video
#Tip 1: Just Start!
I once read somewhere that “procrastination is the thief of time.” And we all know that time is money. You can’t wait till you feel like a pro to post a video.
The sad part is that you won’t know how to create videos until you begin doing it.
That’s because the old adage “practice makes perfect” applies a lot in video production. The tips you learn in the sections below make a lot of sense when you practice them.
So, take the first step and begin publishing one video or two videos.
You’ll become better with several rounds of shooting, editing, and publishing.
#Tip 2: It’s All About The Concept
It’s crucial to define your primary message and the approach for sharing it. Then, each video you create should focus on your core message.
#1 Know your general message
You can brainstorm several ideas. A good video has a strong, clear purpose.
It could be a problem you are trying to solve or some insights you want to share.
By identifying the primary message, you define the focus of each video you choose.
How do you come up with the primary message?

By determining that single action you want your viewers to take.
You can start by asking yourself this:
“If a viewer of my video has to carry one message home or take a single action, what would that be?”
Design your video message so that it will compel viewers to take that action.
#2 Break your content into manageable chunks
You don’t want to put a lot of information into a single video.
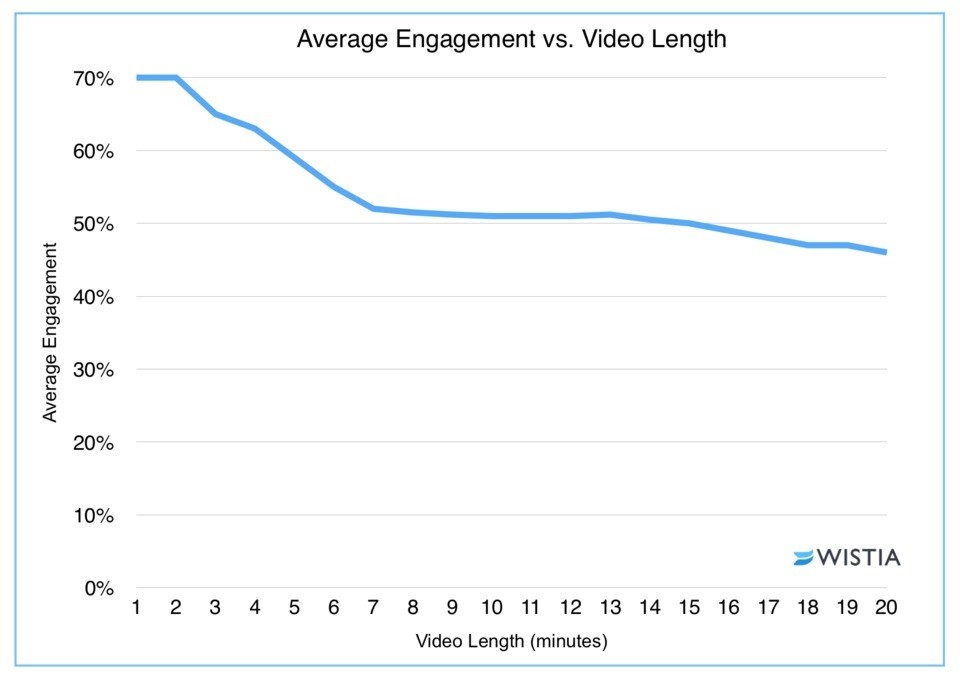
People online have the attention span of a goldfish, actually, according to research that Wisita made, the shorter your video is the more engagement you get.
If you realize that you have a lot to communicate, cut the messages into multiple pieces.
It’s better to share several videos each communicating a single message in a clear, powerful way.
#3 Determine the length of your videos
Ideally, the length of your video is determined by the type of content and the platform you chose to host your videos.
People can sit to watch keynote speeches and training of up to 1 hour.
Of course, such videos should be interesting enough. But this might not work for pranks or product reviews.
In fact, popular videos online are less than 2 minutes long.
Again, the appropriate video length for Facebook is different from that of Instagram or Youtube.
#4 Choose a creative concept too
You want to make videos that vibrate with your specific audience.
Do you want to package your message into video explainers using animations?
Or tell stories? Or shoot promotional videos featuring a celebrity?
Probably you want to live-stream related events?
An effective video involves using a creative approach. Remember, others could already be making videos about the same subject.
You need to find a unique way of passing your message to attract the target audience.
But, you could test different video concepts and styles.
You can get some inspiration for video concepts in this list we made as a part of our vlogging guide.
Experiment with a few and monitor the results. Also, make sure you ask for viewers’ feedback.
#Tip 3: Film On A Clean & Natural Background
You don’t want your viewers distracted by objects of activities in the background.
A clean background ensures that viewers will concentrate on the main subject of your video.
You can use:
- Plain-colored backdrop – it could be a well-propped bedsheet, a whiteboard, a soli-colored wall, or a backdrop paper. A photo paper background can enable you to shoot professional videos from almost anywhere. That way, viewers will hardly tell where the videos are shot. Experiment with different colors to choose one that will bring the best looking background out of your video.
- Work office – you can create a professional environment for your videos. Besides, videos shot in a working space look more authentic and personal. This is a great choice for testimonials.
- Your bedroom – some vloggers and Youtubers started shooting videos from their own bedroom. Make sure that your background is blurred (out of focus) so you let your audience focus on you and what you’re saying. Also, put away objects in your room that will attract too much attention.
What if you don’t feel that proud of your working environment or your room?
You might have noticed some things in the background that will distract viewers as well. In this case, consider a fast lens that can blur everything in the background. This allows viewers to focus on the main subject.
- The outdoors – if you must savor the beauty and creativity in an outdoor environment, there are several factors to consider. For instance, the light outdoors can hinder balanced footage. This means you should consider the time of the day you film. A rule of thumb is to shoot videos either on a cloudy day (without rain) or on a sunny day around sunset when sunlight is not as bright.
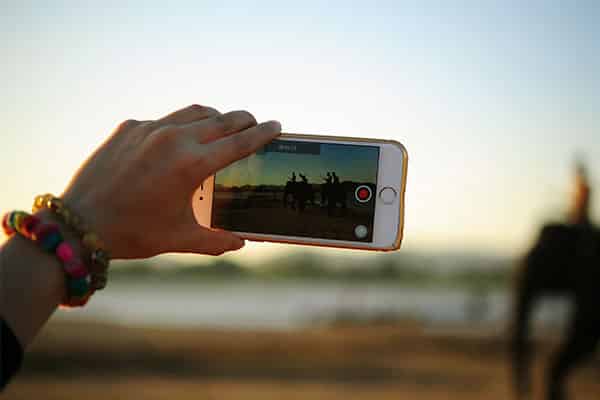
#Tip 4: Record in landscape mode
This is important for those using a phone.
Always hold your phone horizontally when filming videos for Youtube (for Instagram hold your phone vertically).
This gives your film a fitting orientation for videos to be watched on bigger screens like the TV or computer.
Additionally, shooting in landscape mode fits more frames for what you want to capture.
This eliminates the need to regularly tilt your camera to the left and right to capture more details. Recording in landscape mode is your way to ensure a refined final product.
#Tip 5: Use the right lighting
Choosing the proper lighting is crucial. Note that correcting dark videos is almost impossible.
Even if you adjust the light, you are likely to add noise or distort the quality.
#1 Don’t shoot in dark places
One of the things to avoid is shooting under dim light.
The camera keeps on drifting in and out of focus when shooting in low light.
Also, when using auto mode in dim lighting, the camera automatically reduces the frame rate. The erratic film you’ll get here is had to fix.
#2 Go for natural lighting
This is always your best option when filming.
But you’ve to master the right time of the day to shoot.
Your target should be a soft light that shines in the morning and evening around sunset.
Don’t rely on the light that’s straight overhead – unless you want a shadowy effect on the videos. This can work in dramatic videos.
But professional videos need to be focused and straightforward, with lit-up faces.
So, if you must film professional footage during midday, choose a cloudy day. Or, look for a location with a shade where you can find soft light.
#3 Shooting indoors
Let’s say you are taking your footages indoors. You have to be mindful of your source of lighting.
You might use the natural light coming via the windows. If this isn’t enough, consider illuminating the room with one or more lamps placed on the sides or behind you.
Here’s more about basic video lighting:
#Tip 6: Focus and stabilize your video
You can do this by making sure the camera is still and focused on your subject.
Avoid shooting while walking. The camera is likely to shake.
Also, hold your device with both hands.
If you are recording yourself, consider using a tripod stand. Or any other DIY item that can keep your camera in place.
And in case you want to film at close view, don’t use the zoom feature. Instead, try stopping and moving closer to the object.
Zooming while you shoot will degrade the quality of your film.
In fact, every length you zoom gives an inconsistent image.
#Tip 7: Use The Rule of Thirds And The “Golden Ratio”
Your camera is likely to have a 3-by-3 grid covering the area you are filming.
You may have to switch this feature on.
Place the subject along the grid lines. The important elements of your film should appear in the intersections.
The grid lines ensure you record videos at the right angle. It uses the background to align and center your film.
The lines help with composition as well.
Ever watched videos where the speaker seems to be looking over your shoulders?
Align the eyes of the people you record with the top grid lines. This way, they’ll look at viewers directly into the eye.
#Tip 8: Optimize Your Camera Or Phone Settings
Your device’s settings will affect the audio or visual characteristics of your footage.
Two important settings to be careful with are video resolution and frame rate.
- Video Resolution – this setting influences how clear your videos will appear. Most devices shoot videos in 1080 HD and 4K.
- Frame rate – it measures the number of frames recorded per second on your video. Cameras come with 24 fps, 30 fps, and 60 fps. You can get a smooth video with a higher frame rate.
It’s important to note that these settings will influence the size of the footage.
So, think of your device’s storage capacity when selecting the resolution and frame rate.
#Tip 9: Use Basic Video Editing Concepts
You can fine-tune your videos with good video editing software.
Choose one that can enable you to do simple enhancements such as:
- Clean up background noise
- Adjust the lighting
- Cut any weird pauses and silences
- Add background music and transitions
For beginners – here’s how to edit your videos on your mobile phone!
For more advanced editing – here’s how you can use some professional video editing apps like Final Cut Pro or Adobe Premiere Pro to edit your videos with these techniques
#Tip 10: Work On Your Camera Presence
When filming people – could be you or another person – how they conduct themselves impacts the quality of the video.
A professional video should show that you have great confidence and that you’re comfortable filming yourself. How do you carry yourself?
- Be calm and friendly – start your video with a warm smile.
- Stand straight with your shoulders back. If you are sitting, avoid closing your legs.
- Get rid of nervousness by keeping your hands occupied – you can try writing on a whiteboard if possible. This removes your focus from the camera.
- Talk slowly and make sure you pronounce each word clearly. See the next tip #11.
- Practice – for each video you post, take time to watch it and highlight areas where you want to improve. With time, you’ll get comfortable being on the camera.
#Tip 11: Talk clearly and be focused
How you pronounce words will determine whether your audience will grasp your message.
Your viewers can’t watch a video to the end if they don’t understand your message.
Avoid such blunders by practicing your diction throughout the process of making videos.
Tips to improve your diction
- Articulate long words slowly, carefully – without slurring or stammering
- Speak from your diaphragm and not your throat
- Sit/stand straight – it boosts the strength of your voice. It also makes your words clearer
- Keep your throat hydrated by drinking fluids in between the breaks.
#Tip 12: Invest in the sound of your video
Poor audio can break your video – even if the visuals are world-class.
Let’s say you already have robust sound equipment. There are other tips you can use to improve the sound quality – some of which are mentioned in #11.
Additionally, hold the microphone as close to the subject as possible.
When recording, don’t zoom.
Just like zooming will ruin your visuals, it can interfere with the clarity of the sound as well.
It’s also helpful to purchase a moveable mic if you want to shoot on-the-go like one of these 15 microphone options that you can purchase from Amazon.
Such mics are convenient to carry and set-up at your new location.
A good mic is treated with high-density acoustic foam to aid exceptional noise absorption.
Conclusion
We live in a time where shooting good videos is extremely easy.
The videos are a powerful means of gaining traffic and boosting engagement in your marketing channels.
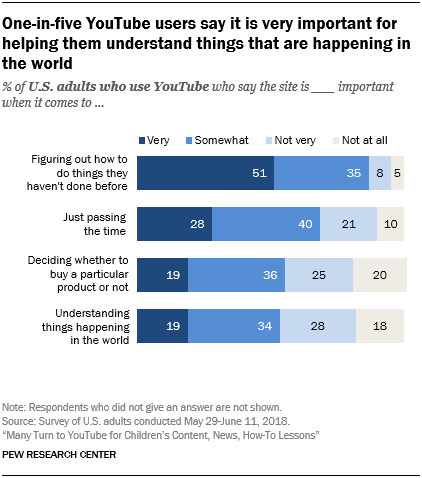
Based on a 2018 Pew Research, many people go to Youtube when they want to learn how to do something new or want content for their kids.
This means the trend of watching videos is just growing every year.
Are you a social media influencer or a marketer publicizing your products or creating your brand’s awareness?
If you aren’t using videos already, you are committing one of the biggest inbound marketing crimes of the 21st century.
Already creating videos? Comment below and let us know any other tricks you are using to make your videos look awesome.
Maureen Kasyoka is the editor of Weshare’s blog. She has gained excellent research and writing skills through the years, writing on ranging of topics from social media to marketing in more than 5 years.
We Also Reviewed
- 45+ Advertising Statistics That Will Blow Your Mind
- 33 CRM Statistics You Should Know
- 41+ Public Speaking Statistics You Should Know
- 35 Machine Learning Statistics You Should Know
- 34 Employee Burnout Statistics You Should Know
- 39+ Communication Statistics You Need To Know
- 37+ Cold Calling Statistics You Need To Know
- 21+ Entrepreneur Statistics You Should Know
- 35+ Contract Management Statistics You Should Know
- 37+ Zoom Statistics You Should Know
- 35+ Sales Training Statistics You Should Know About
- 75+ WordPress Statistics You Need to Know
- 41+ Startup Statistics You Need to Know
- 37+ Presentation Statistics You Need To Know
- 41+ Recruiting Statistics You Need to Know
- 23+ Apple Podcast Statistics You Should Know About
- 31+ Spotify Podcast Statistics You Should Know About
- 35+ Spotify Statistics You Should Know