
Learn how to change the lock screen clock in some easy steps. Also discover how to change the clock on Android and iPhone.
Whether you’re unlocking your iPhone or iPad for the first time, changing lock screen clocks on Macs and PCs can be tricky. But don’t worry! In this blog post, we’ll show how simple it is with a few easy steps that anyone should be able to follow easily even if someone has never changed their lock screen clock before in their life (or at least not since kindergarten) they can easily do it after going through this blog post. So, what are you waiting for? Follow these simple steps to have everything sorted.
Let’s first talk about how to change your lock screen clock on Android in a few simple and easy steps.
Clock locks for your Android phone! When you add a clock to the lock screen, it can help keep track of time without having unlocked your phone. Some phones also have an always-on display that will show up when in sleep mode – so even if its notion won’t turn off completely just yet there’s still something useful waiting on your screen that is the clock.
Unfortunately, the latest Android phones don’t allow you to customize your clock. It’s on by default and only changes based upon certain elements—like when there are unread notifications showing up front-and this is true for both versions 11 or older devices as well!
The good news? You can still turn that pesky timepiece into something beautiful though; just alter its appearance with easy using different templates available online (or even create one yourself)!
If you have an Android device, changing the lock screen clock is a very simple process. Just follow the steps discussed below.
Change Lock screen Clock On Android Using Simple Steps:
You can keep track of the time without having to unlock your phone with a clock on its lock screen or an always-on display that’ll show you what hour it is at all times.
Following are the steps to be followed:
Step # 1: Open Settings
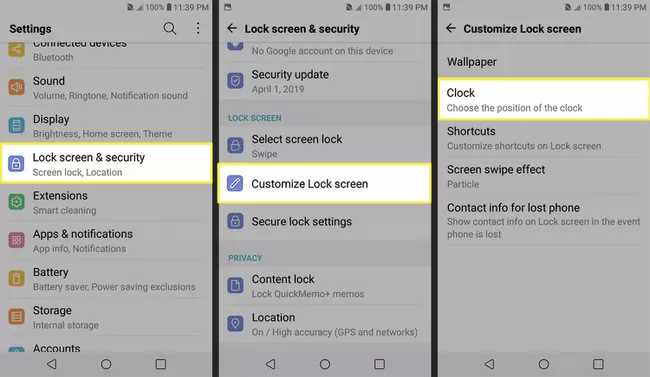
Open the Settings app on your Android phone and go to Security & Location.
Step # 2: Navigate the Lock Screen and Security
Next, go to the Lock screen and security section in your phone’s settings. This is where you can find options like choosing a password or pattern for when it’s time to lock yourself out of curiosity!
Your phone’s settings might also be referred to as either Lock screen or Security options depending upon your phone so you need to find it on your device carefully!
Step # 3: Customize the Lock Screen
In the Lock screen and security menu, you’ll find an option called Clock. Tap it to open a list of all the clocks that are currently available on your lock screen.
If you want to use a built-in clock face, tap one of the default options. If you want to use a custom clock, skip ahead to customize the lock screen.
Step # 5: Find a Clock Widget for Your Lock Screen
Now that you’ve decided on which type of clock you want, it’s time to find the right widget. Clock widgets come in all shapes and sizes, but they all do the same thing-show you what time it is!
In order to select the widget tap and hold an empty space on your home screen, then select Widgets from the pop-up menu. Scroll through the list of widgets until you see one that looks like a clock (it will likely have the word Clock in its title).
Once you’ve found the widget, drag it to an empty space on your home screen. If you don’t see any empty spaces, scroll to the bottom of your widgets and tap the + symbol to add another row.
Step # 6: Customize Your Lock Screen Clock Widget
Once you’ve added the clock widget to your home screen, you can customize it to show the time, date, battery level, or even weather information. To do this, tap and hold on to the widget until a pop-up menu appears.
From here, tap the gear icon to open the widget’s settings. Here you can choose what information to display, as well as the size and color of the widget.
That’s all now you can see the clock of your own choice on your android phone Lock screen.
How To Get The Clock On The Lock Screen When Phone Is Off:
If you want to see the clock on your lock screen even when the phone is off, you’ll need to enable the always-on display by following the simple steps.
Step # 1: Go to Settings
In order to view the clock even if the phone is turned off first of all go to the phone’s settings app.
Step # 2: Tap Security and Location
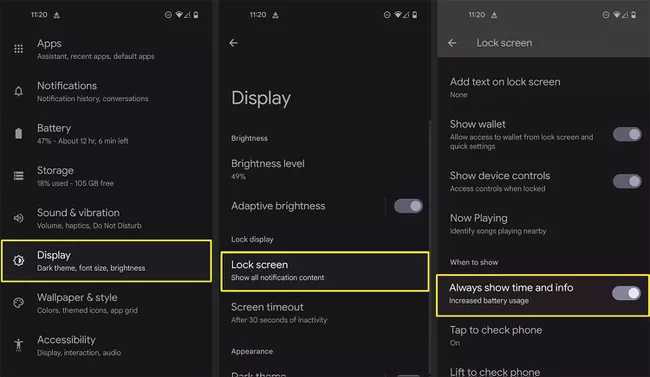
In the settings app, go to the Security and location tab.
Step # 3: Now Select Lock Screen
Under the security option, click Lock Screen and security.
Step # 4: Select the Always Show Time Option
In order to view the clock even when the phone is off, select the Always On Display option and that’s all.
Now that you’ve enabled always-on display, tap on the Clock option in the Lock Screen and Security menu to choose a custom or built-in clock face.
You can also change other settings like Show Date, Hide Notifications, and more.
Now you will be able to see the time on your lock screen even when your phone is turned off!
How To Change Lock Screen Clock On Your iPhone In Simple Steps:
Let’s get started! If you want to change the clock on your iPhone, then this guide is perfect for beginners like yourself. To begin with all that fretting and fast-paced action take a deep breath as we dive into changing how many time zones are displayed by going down below in the “How Do I Change My Clock?” section – just follow these simple steps.
The iPhone’s lock screen is a great way to access tons of features in just seconds. You can see what time it really is, turn on your flashlight with one tap if needed while being outdoors at night without reaching for your phone – all right there waiting patiently behind the glass lens!
Would you like a new clock for your iPhone or iPad? Well, if the answer is yes then read this blog post carefully.
Let’s begin!
The first thing that you need to do is to change the default wallpaper. Following are the simple steps to do so:
- Firstly, open your iPhone Settings.
- After that go to the Wallpaper tab.
- Now, tap Choose a New Wallpaper.
- Select the location of the new wallpaper you want to choose and then tap on the image you want to use.
- Finally, click Set and you are done.
The second thing now you need to do is change the lock screen clock features according to your taste by following the given below easy steps.
First, let’s change the color of your lock screen clock. Follow the simple steps given below to do so:
- Open the Settings app on your iPhone.
- Now, go to General
- After that, tap on Accessibility
- Scroll down and select Display Accommodations.
- Tap on Color Filters and then turn ON the Color Tint feature.
- A color wheel will appear on your screen; use it to change the color of your lock screen. There are many options you can set it accordingly.
Now, let’s learn how to remove the city from the clock displayed on your lock screen. Here are the steps to be followed:
- Go to Settings > Clock.
- Toggle the switch next to “City” to OFF.
- That’s it!
So far, Apple doesn’t allow us to move the digital time on our iPhones left or right. We can only change how quickly it moves by clicking an app like a clock face with hands that are analog for now!
One more important thing while setting your lock screen is to set the accurate time. Now you must be wondering how to do so? Don’t worry we have answers to every query!
Here are some simple steps to set the time on your iPhone lock screen:
- First of all, go to Settings.
- Then tap on the General option.
- After that select Date & Time.
- Now, toggle the switch next to “Set Automatically” to ON.
- This will set your iPhone’s clock to the correct time based on your location.
You can also set the time manually by tapping on the 24 or 12-Hour Time.
And that’s it! You have successfully changed your lock screen clock.
Now you know how to change your lock screen clock on your iPhone in simple steps. Just follow the given instructions and enjoy customizing your phone according to your taste.
Change Lock Screen Clock On Windows In Easy Steps:
Windows Time service is a vital component in keeping your computer’s clock accurate and synced with the global community. If this important program isn’t configured correctly, you may experience problems such as an incorrect time on the lock screen or other issues related to date/time stamps from websites like Facebook which require these details for proper operation
Following are some steps to be followed to configure time on your PC’s lock screen clock:
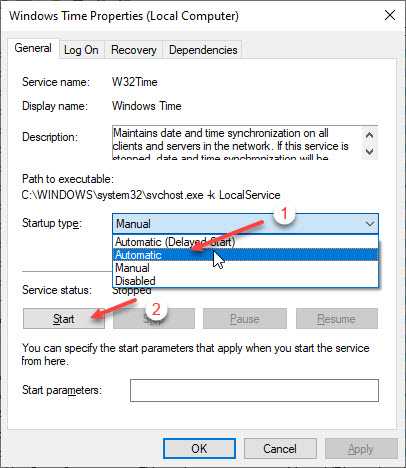
- Search for “Services” in the Windows search bar and open it.
- Locate the Windows Time service, right-click on it, and select Properties.
- In the properties window, set the Startup type to Automatic and click on Apply followed by OK.
- Now, restart your computer for the changes to take effect .
- After your computer has restarted, open the Date and Time settings again.
- Click on the change date and time button.
- Make sure the time is set correctly and in the correct time zone.
- Click on OK to save your changes.
- Now that your computer’s time is set correctly, the lock screen clock should also be displaying the correct time.
- If it is not, or if you are still experiencing problems with date/time stamps on websites, toggle the switch next to “Set Automatically” off and on again.
- This will reset the Windows Time service, which may fix your issue.
- If you are still having problems, try restarting your modem or router.
These are some simple steps that you can follow to configure time on your PC’s lock screen. Now you have set your clock and you are ready to go.
That was all about setting time now let’s discuss how to change lock screen clock format on your PC. This really sounds interesting!
Windows has various ways to customize your lock screen. You can choose between displaying a clock and having it show you time in 24-hour or 12-hour mode, depending on what’s more convenient for when checking the PC after turning it on.
There are also other features that may be available like being able see what day of the week it is by looking at these little squares pop up below every five minutes.
To change your computer’s clock, there are two options. You can use Windows settings and Control Panel to do so – either way it will also format the taskbar in time for you!
In order to format your clock using Control panel following are the simple steps:
- Search for the control panel.
- Click on the Clock, Language, and Region.
- Then click on Change date, time, or number formats.
- Under Format, select the format you want to use from the drop-down menu.
- Click OK to save your changes.
- You can also change how your clock appears in Windows settings if you wish.
- Click on the region setting.
- Open long time menu.
- Now select the desired time format from the options given in the drop down menu.
- Now click Apply button.
- Switch to administrator tab and copy the settings.
- Tick the Welcome screen and System accounts checkbox.
- Now close all the windows and restart your computer to get the change.
Conclusion
Now that you know how to change your lock screen clock, it’s time to try it out! Format your computer according to your preference and enjoy having a custom lock screen.
That’s all for this post! Be sure to check back soon for more tips and tricks on Windows customization.
Hope you have enjoyed reading this blog post. Thanks for reading this blog post! Stay tuned for more interesting blogs. If you have any questions, please let us know in the comments below!
Eisha Gul is a part of Weshare’s writing team. She has social media marketing experience for over 4 years and has been writing in-depth guides and articles about the industry ever since.
We Also Reviewed
- 23+ Apple Podcast Statistics You Should Know About
- 31+ Spotify Podcast Statistics You Should Know About
- 35+ Spotify Statistics You Should Know
- 45+ Advertising Statistics That Will Blow Your Mind
- 33 CRM Statistics You Should Know
- 41+ Public Speaking Statistics You Should Know
- 35 Machine Learning Statistics You Should Know
- 34 Employee Burnout Statistics You Should Know
- 39+ Communication Statistics You Need To Know
- 37+ Cold Calling Statistics You Need To Know
- 21+ Entrepreneur Statistics You Should Know
- 35+ Contract Management Statistics You Should Know
- 37+ Zoom Statistics You Should Know
- 35+ Sales Training Statistics You Should Know About
- 75+ WordPress Statistics You Need to Know
- 41+ Startup Statistics You Need to Know
- 37+ Presentation Statistics You Need To Know
- 41+ Recruiting Statistics You Need to Know