
Learn how to schedule a Webex meeting and discover the tricks that will guarantee a successful Webex meeting.
If you’re a business professional, chances are you have to schedule meetings with other businesses on a regular basis. We know that the prospect of scheduling a meeting is never exciting. In fact, it’s downright tedious. But what if there was an easier way? What if we could tell our computers when and where we want to meet and it would find available times for all? That’s exactly what Webex does! There are several steps involved in setting up your first Webex meeting; we’ll cover them all here so that even the most novice user can feel confident about how to get started. So let’s get right into it!
What Is Webex?
WebEx is a web conferencing platform that enables users to schedule and conduct online meetings. It offers features such as HD video, audio, and screen sharing capabilities. Additionally, it allows for file sharing, polling, and annotation tools.
The best part about Webex? It’s completely free! All you need is an internet connection and you’re good to go.
Webex is the perfect solution for collaboration. Not only does it have a simple, easy-to-use interface that can be accessed from any device but with one button push you and your attendees are able to start or join meetings in seconds!
And don’t worry about having difficulty taking notes because WebEx has the industry leading AI features that will allow everyone attending this meeting easier accessibility when needed most- all without needing anyone else’s assistance whatsoever. The output is friendly yet professional!
How To Schedule A Webex Meeting?
Webex is a great way to connect with colleagues and clients in real time. The technology has been around since the early 2000s, making it one of the more established solutions on offer today.
You can have up to 100 people in your meeting at no cost. The meetings are unlimited and you don’t need a timer, so this is an online option that’s perfect for those who want more flexibility.
Webex for Mac, PC, and Mobile devices are the best way to get started with Webinars. You can easily schedule a meeting from your favorite device in minutes!
Let’s take a look at how you can do it from different devices.
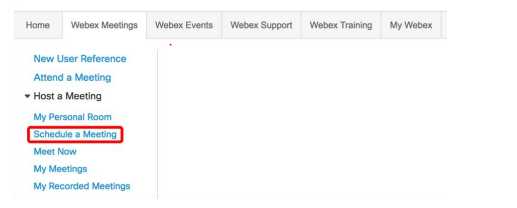
How To Schedule A Webex Meeting On A PC?
Since almost everyone has a computer or laptop at home, so first let’s see how you schedule a Webex meeting on a computer or PC.
There are several steps involved in setting up your first Webex meeting (not counting signing into the platform itself). The following is a brief overview of how it’s done:
Step # 1: Set Up A Webex Account
To get started with Webex, you need a web browser. If that’s not installed on your device yet then click “Start for Free” and follow the instructions to download one or install it directly through Google Play Store. Otherwise, if you already have an account, then just sign in to an account using your credentials.
Step # 2: Set Up The Meeting
To get straight into the meeting, copy that link under Personal Room and paste it onto your page. You can share this with others too so they know where things are going when you start talking about logistics or other important details.
Step # 3: Start A Meeting
Now that you have accessed the meeting room, the next thing you need to do is to start the meeting. just head over to the icon saying ‘Start A Meeting’ and click on it.
Step # 4: Join The Meeting
Once you have started the meeting, Webex will begin to get ready to start the meeting. Click “Join from your browser.” If you prefer, install their desktop app and run it through there instead.
From here, you can either continue to watch your video in the privacy of your home or join it with someone else. When ready for more conversation (or if there are no more messages), click “Start meeting.”
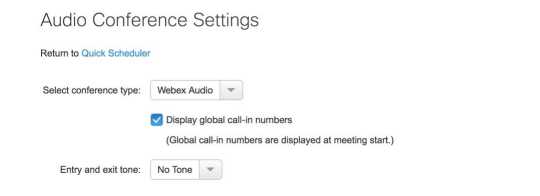
Step # 5: Adjust The Audio Settings
Click the three-dot menu and choose “Speaker, microphone, or camera.” In the settings dialog box make sure that your devices are selected so you can hear yourself talk! Then click X to close it all down.
Webex Audio should be selected as the default audio option for your meetings. If you want to allow attendees from international phones, then we recommend selecting “No Tone” when they join in on a call so that any tones do not disrupt what’s being discussed during discussions or interviews with participants of different cultures around the world.
Step # 6: Copy Meeting URL
Click the “i” icon at the top left of your screen. In the pop-up window, copy the meeting link and send it to whoever wishes you to join!
How To Schedule A Webex Meeting In Advance?
If you’re looking to connect with someone in the near future, we have a few options for scheduling times that work well. And Webex is top on the list!
Webex also enables you to schedule a meeting for any time in the future. Here’s how you can do it:
Step # 1: Select Schedule
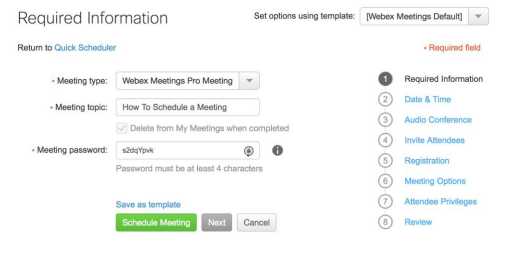
The first thing you need to do is to head to the Webex website and log in with your email address and password. From there, head over the “Schedule” button on the right-hand side of any page which will take users directly into scheduling mode so they can start planning their meeting or conference call without ever having left WebEx’s website interface.
Step # 2: Fill The Details
You can set a meeting on the Schedule A Meeting page by completing its form. You will need to enter some information about your company and what conference room, if any, is available before choosing the date/time of appointment so that they are correct for both parties involved in scheduling this event!
A great way would be entering “Meeting Title,” which should include something like “Coffee Break” or even simpler yet: “Break Time”. Simply fill in all the required information.
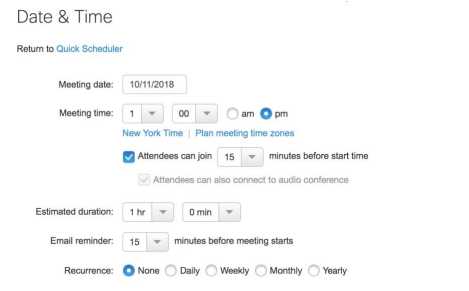
Step # 3: Set Date And Time
Select your meeting date and start time. You can allow attendees to join 5-15 minutes early if desired! For the estimated duration, we recommend adding an extra 10 or 15-minute cushion at the end of each scheduled session so that you won’t experience any hiccups in communication due to lengthy discussions happening right when they’re supposed to be wrapping up.
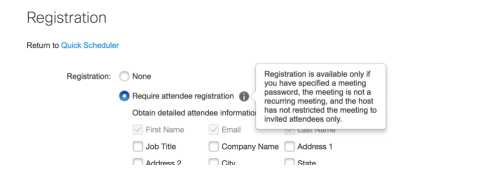
Step # 4: Regiser Attendess
You can require attendees to register prior to joining. First and last names are automatically selected, but you may select from additional options if needed!
Please note that Meetings requiring registration aren’t limited only to registered participants – anyone with the link or password will be able to join in on these important discussions.
Step # 5: Click Schedule
Now that you have followed all these steps, the last step would be clicking on the “Schedule” button.
And that’s how easy it is to schedule a meeting in advance with Webex! In just a few minutes, you can plan an entire conference call without ever having to leave the website! Just remember to copy your meeting link and send it out to everyone who has permission before they are able to join in on the conversation.
How To Schedule A Webex Meeting From Your Phone?
If you’re on the go and need to schedule a meeting from your phone, we have an easy process for that too! Webex can help you with that. How? Read on to find out!
Step # 1: Install The Webex App
Firstly, you will need to install the Webex app. The Webex Meet app is available in iTunes and Google Play stores. Once installed, sign in to your account with a few taps to find great meetings just waiting near where you are right now!
Step # 2: Start A Meeting
If you want to start a meeting right away, just swipe over and tap “Start Meeting” on the second page. Then in the Personal room click “start” so we can get started.
Step # 3: Schedule A Meeting
If you’d rather schedule a meeting for later, tap the New Meeting icon at the top right corner of your screen — it looks like an open calendar with plus signs throughout. Simple click on it in order to schedule your meeting on Webex.
Step # 4: Fill The Details
Now follow the same procedure that we did for scheduling on PC. Once you click on schedule, a scheduling form will open up. Fill this form and enter in all the details such as the start time of the meeting, the duration of the meeting, and the email addresses of your attendees.
Don’t worry if you have skipped any attendees, they would still be able to join via the meeting link.
Step # 5: Click Start
When you’re done scheduling the meeting, tap “Start” to send out invitations. The app will automatically put it on your schedule and show up as one of those scheduled meetings! Just click ‘start’ at what time works best for everyone involved so we can get started right away.
How To Join A Webex Meeting?
Sometimes the occasion arises when we wish to join an already scheduled meeting. Joining a Webex meeting is just as easy as scheduling one. Just follow these easy steps!
Step # 1: Open The Webex Meeting Link In Your Email Or On Your Calendar
In order to join the meeting from your phone or computer, simply open up a link in your email. This will be sent out by whoever scheduled this event on their end. This meeting invitation will also show up on your calendar, so it’s easy to remember and schedule accordingly!
Step # 2: Click Join Now
Once you’ve opened the link in your email or on your desktop screen, simply click “Join now” as shown below. You’ll be taken directly into a video conference with everyone who has scheduled the meeting!
Step # 3: Press The Button On Your Screen
Once you’re on a call with everyone else, simply click “Join Meeting” and wait for Webex to connect. Once it does, we’ll be ready to start our conference call or video chat session immediately! This is how easy it is to join a Webex meeting.
Step # 4: Sit Back And Enjoy Your Meeting!
Once you’ve joined the call, all that’s left to do is sit back and enjoy your chat or video conference with everyone else who has signed up for this event!
How To Mute/Unmute On Webex?
Muting is simple when you’re on a Webex meeting. It’s just like muting your phone or computer, but the video will still be up and running!
When talking over a conference call with others, it may become necessary for you to mute yourself so that others can hear themselves talk. In order to do this, you will need to press the “mute” button on your phone or computer screen. This is usually a red circle with a white dot.
Once muted, no one on the call will be able to hear you until you press the “unmute” button which is a green circle with a white dot in the middle.
While you’re on mute, someone may have sent out an urgent message that needs to be addressed immediately. In this case, simply click unmute and join your team back into the conversation. It should take no more than five seconds for this to happen! At that point, the conversation is back on.
How To Turn Your Camera Off On Webex?
There will be times when you’ll want to turn off your camera during a meeting. Perhaps you’re in a public place and don’t feel comfortable having your image broadcasted to the entire group. Or maybe you just need some privacy for the time being.
In order to turn off your camera, press the “camera” icon on your screen. This is usually a small image of an eye with a green checkmark in the middle. Once you’ve turned off your camera, it won’t be broadcast to everyone until you turn it back on!
How To Record Your Webex Meeting?
If you are running a business, it may be important to record your meetings in order to keep track of all the details. Recording your meeting on Webex is just as simple as scheduling one.
But before doing so, you need to be familiar with the recording rules of Webex. These are mentioned below:
Recording The Webex Meeting On Cloud
Hosts who have paid Webex accounts can record meetings and store them in their online cloud account. Using a paid subscription, only the host of a meeting may start recording it while others are able to view what’s happening live or after they have already ended for those that were not there from the beginning until the end with no discrepancies between either party involved since each will know exactly how long everything took place over time.
Recording The Meeting Locally On PC
Webex meetings can be recorded directly to a computer and all participants, including the free users, have access. Only the host of your meeting will be able to start recording it while others need permission from their peers present in order for them to join in what’s happening during conference calls or webinars
Now that we have covered the rules, let’s take a look at how to record a Webex meeting.
Step # 1: Navigate For The Record Option
If you have permission to record a meeting, then there should be an option for “Recording” or something along those lines in your toolbar. If not – don’t worry! Just click on the circle labeled Share Content and choose where/how people can view this recording later once it’s done being made.
Step # 2: Click Record
Once you have found the record button, all there is left to do is simply click on record. By doing so, the recording of your meeting will automatically begin.
Step # 3: Save The Recording
If you have a paid account, then now is the time to decide whether or not your recordings will be saved in cloud storage. If free accounts are what’s got going on at home, just click on “Choose folder” when prompted by Where Should I Save My Recording File? the dialog box and find where it’s easiest for all parties involved!
Simply select the destination path and save your recording.
Step # 4: End The Recording
When you want to end the recording, simply click stop. You have successfully saved your Webex meeting’s information! Now everyone with access can watch it over and over again until something better comes along.
How To Share Your Screen In A Webex Meeting?
If you need to share your screen during a web ex meeting, there are a few things that will be displayed on the screens of all present in the call.
To start off with, everyone would have access to what’s being shown on their own personal laptop or desktop computers before anything else! So if they want to keep an eye out for anything important, they can.
This is especially helpful if you’re the host of the meeting – everyone will be able to see what’s happening on your screen in real time regardless of where they are located. This makes it really easy for hosts to guide their participants through whatever process or product they may be showcasing.
This can be done by either selecting “Share Screen” from the toolbar or by pressing Ctrl+Shift+S on your keyboard.
How To End A Webex Meeting?
Ending a Webex meeting is just as easy as scheduling one. You can either have the host end it or you can do it yourself.
When you’re ready to end the meeting, simply follow these steps:
Step # 1: Click On End Meeting In The Toolbar
This will prompt a message box asking if you want to end the meeting for all or just some of the attendees.
Step # 2: Select Who You Want To End The Meeting For
Selecting All will end the meeting for everyone while selecting Selected Participants will only end it for those that you have chosen. This is a great way to gracefully exit out of meetings without having to worry about leaving anyone behind.
Step # 3: Click End Meeting
Once you have selected who is to be included in the ending process, all that there’s left to do is click on the end meeting. Your Webex meeting will now come to an official close! No need for goodbyes or anything of the sort – it’s best just to exit out of the meeting completely.
How To Open The Chatbox Of A Webex Meeting?
When you enter into a Webex meeting room, there are a few features that will be readily available to you.
The first is the chat box which can be found on the bottom left-hand side of your screen. This is a great place to communicate with all participants in real-time.
The chatbox has a few different features that you can make use of while in a meeting. First is the ability to send messages as well as emojis to all participants. This is great for adding some light-heartedness into potentially tense meetings or just for keeping everyone on their toes!
The chatbox also has the ability to send files, URLs, and images – giving you a wealth of options for communicating with everyone. This is incredibly helpful when it comes time to share documents or just about anything else that might be pertinent.
You can access the chatbox by clicking on the chat icon that is available in the toolbar present at the bottom of your meeting.
Features Of Webex For A Successful Meeting
There are a few features of Webex that can make your next meeting a total success. Here are some to get you started:
-The ability to record meetings – so everyone can revisit what was discussed later on
-A dial-in number for people who cannot join through the web interface
-Integrated chat capabilities
-Ability to share screens
-HD video and audio quality so everyone can see and hear clearly
-The ability to mute all participants except the host – in case someone’s phone goes off or they need to take a break from the meeting
-A pause button in case you need to step away for a moment but don’t want to end the meeting prematurely.
Tips And Tricks To Follow While Using Webex
There are a few tips and tricks that can help you make the most of your Webex experience. There are also some keyboard shortcuts that are present on the tip of your fingers which you can access at any time in order to get things done instantly. Some of these tips are mentioned below:
1. Make Sure You Hear Everyone having
If you are having trouble hearing someone, then try increasing the volume on your side. If that doesn’t work, then there’s a quick and easy way to adjust the audio settings. Just click on the speaker icon that is located in the toolbar and select your preferences. This will help you ensure that everyone can be heard loud and clear during your meeting.
Tip: If you’re having trouble with people talking over each other, try decreasing the microphone volume in order to give others a fighting chance.
Tip: If there are certain individuals who need extra focus during meetings, click on their name within the chatbox
2. Screen Share Shortcut
If you need to share your screen instantly in a matter of seconds, then access the shortcut on your keyboard. Simply press Ctrl+Shift+S on your keyboard to share your screen with your participants.
3. End Meeting Shortcut
To end the meeting for all participants, press Ctrl+Alt+End on your keyboard. This will instantly end your meeting.
4. Mute Shortcut
To mute or unmute all participants except the host, press Ctrl+M on your keyboard. This is great if someone’s phone goes off or they need to step away from the meeting for a bit.
5. Problem With Video Or Audio
If you’re having problems with the audio or video, try restarting your browser entirely. This will give you a fresh start and will help you to get things done instantly.
6. Technical Difficulties
If you’re having any other technical difficulties, contact a customer service representative to help resolve them as quickly as possible. They can be reached at [email protected] and will have someone available to assist 24/hours per day!
Wrapping Up
In conclusion, using Webex is a great way to have successful meetings with your colleagues. By following the simple tips and tricks that are mentioned in this blog post, you’ll be on your way to having productive meetings that everyone can enjoy! Thanks for reading!
Eisha Gul is a part of Weshare’s writing team. She has social media marketing experience for over 4 years and has been writing in-depth guides and articles about the industry ever since.
We Also Reviewed
- 41+ Recruiting Statistics You Need to Know
- 23+ Apple Podcast Statistics You Should Know About
- 31+ Spotify Podcast Statistics You Should Know About
- 35+ Spotify Statistics You Should Know
- 45+ Advertising Statistics That Will Blow Your Mind
- 33 CRM Statistics You Should Know
- 41+ Public Speaking Statistics You Should Know
- 35 Machine Learning Statistics You Should Know
- 34 Employee Burnout Statistics You Should Know
- 39+ Communication Statistics You Need To Know
- 37+ Cold Calling Statistics You Need To Know
- 21+ Entrepreneur Statistics You Should Know
- 35+ Contract Management Statistics You Should Know
- 37+ Zoom Statistics You Should Know
- 35+ Sales Training Statistics You Should Know About
- 75+ WordPress Statistics You Need to Know
- 41+ Startup Statistics You Need to Know
- 37+ Presentation Statistics You Need To Know